This procedure describes a scenario when a vehicle indicates need for service and
the customer requests a service booking via Sensus Connect. The customer is driving a vehicle with primary driver and preferred dealer set.
-
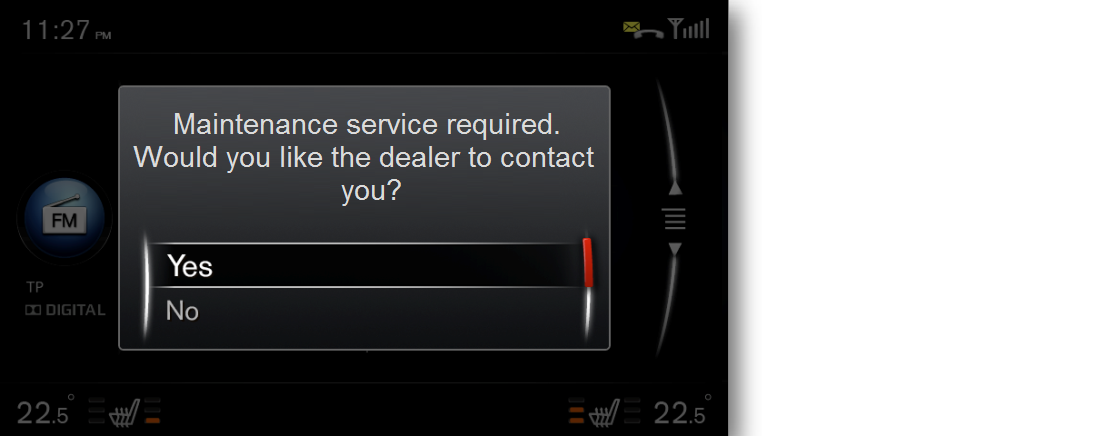
A customer has just parked when a pop-up message is shown in Sensus Connect, informing that it is time to book next service.
-
The customer selects from the options presented.
-
Another pop-up is shown, asking for the agreement to use the customer's current phone connection or P-SIM to transfer
data.
-
The customer selects to confirm.
| ð
|
The customer's service booking request and the current State Of Health data is transferred to the customer's preferred dealer.
|
-
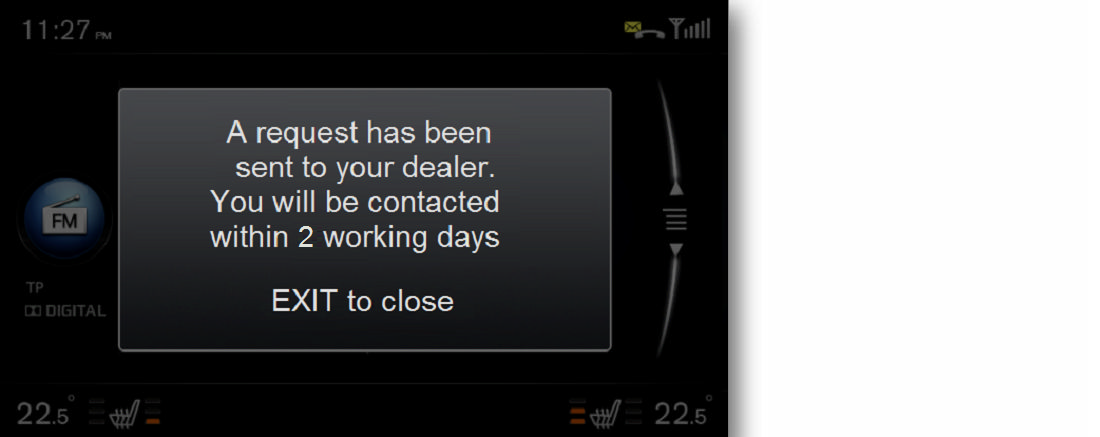
Another pop-up message in Sensus Connect confirms that the service booking request was successfully sent to the dealer and that the customer will be contacted
by the dealer within 2 working days*.
* Configurable per market.
Note
This specified time frame is the dealer's promise to the customer which must be kept in any circumstances, in order not to
disappoint the customer. The Workshop Appointment Management functionalities support the dealer not to forget any customers. An email will be sent to the dealer's service manager/department
in case a booking request has not been picked up and processed from the list within 24 hours*.
* Parameter set at market level.
| ð
|
The service light and message in the vehicle's DIM is turned off.
|
-
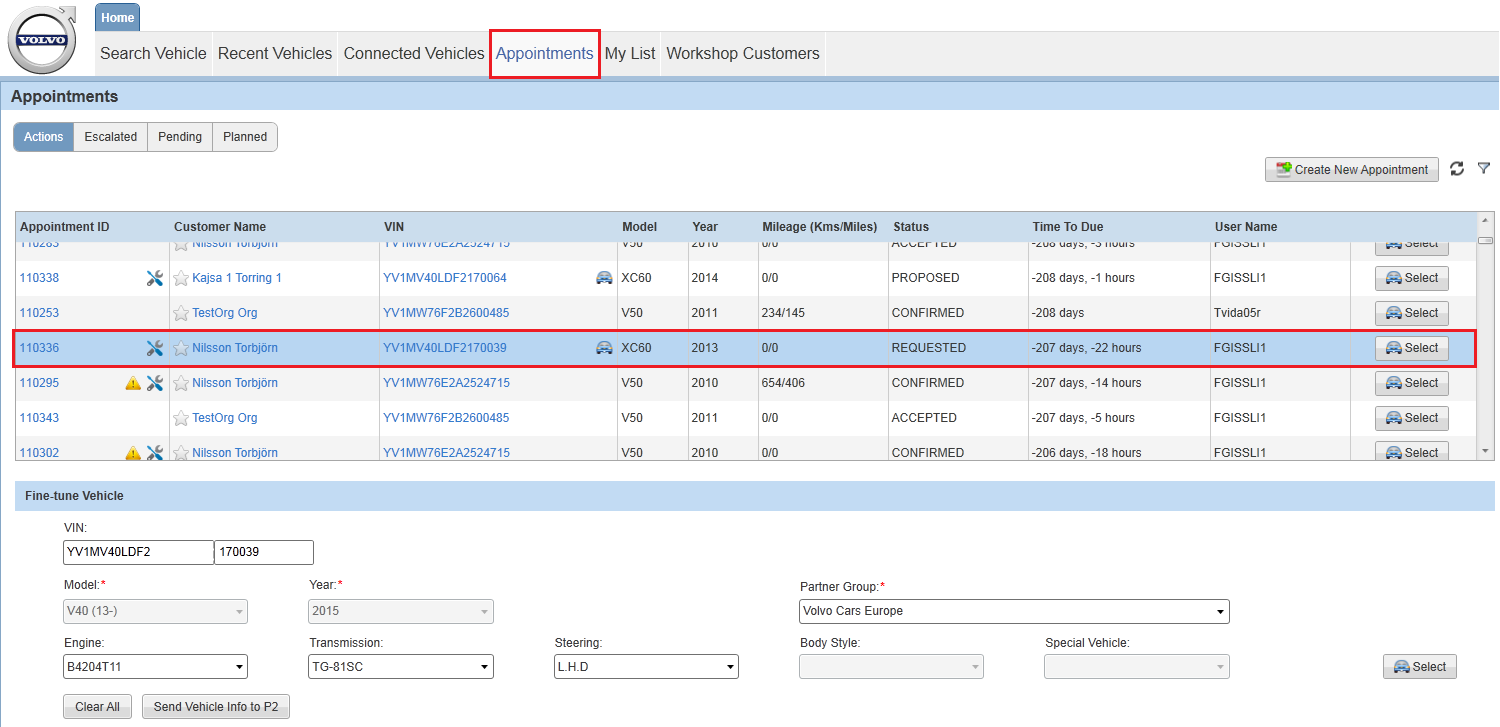
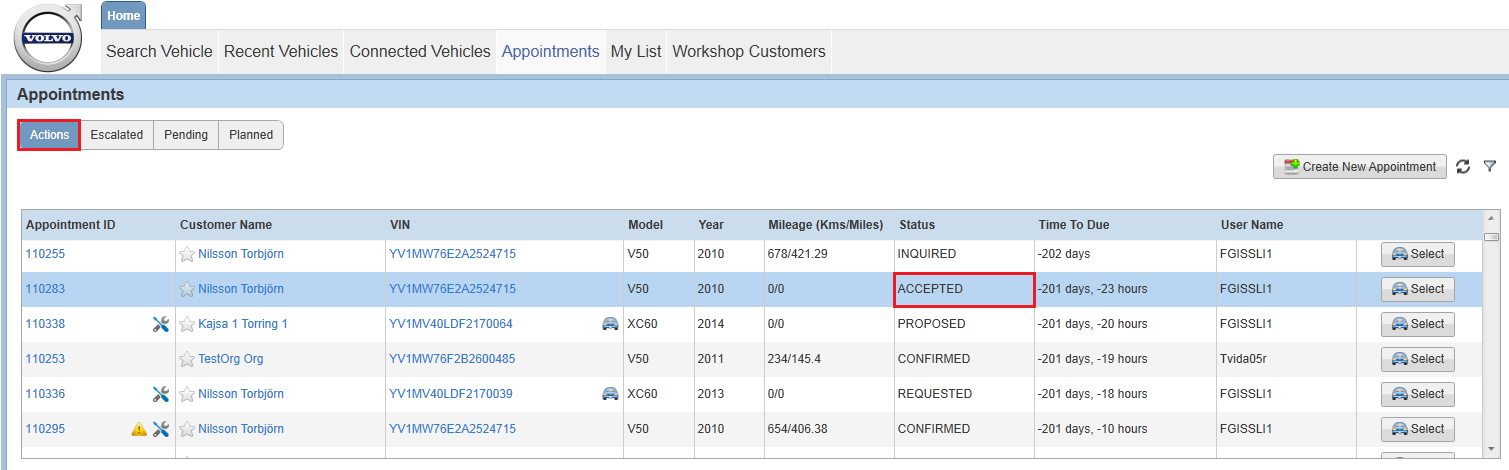
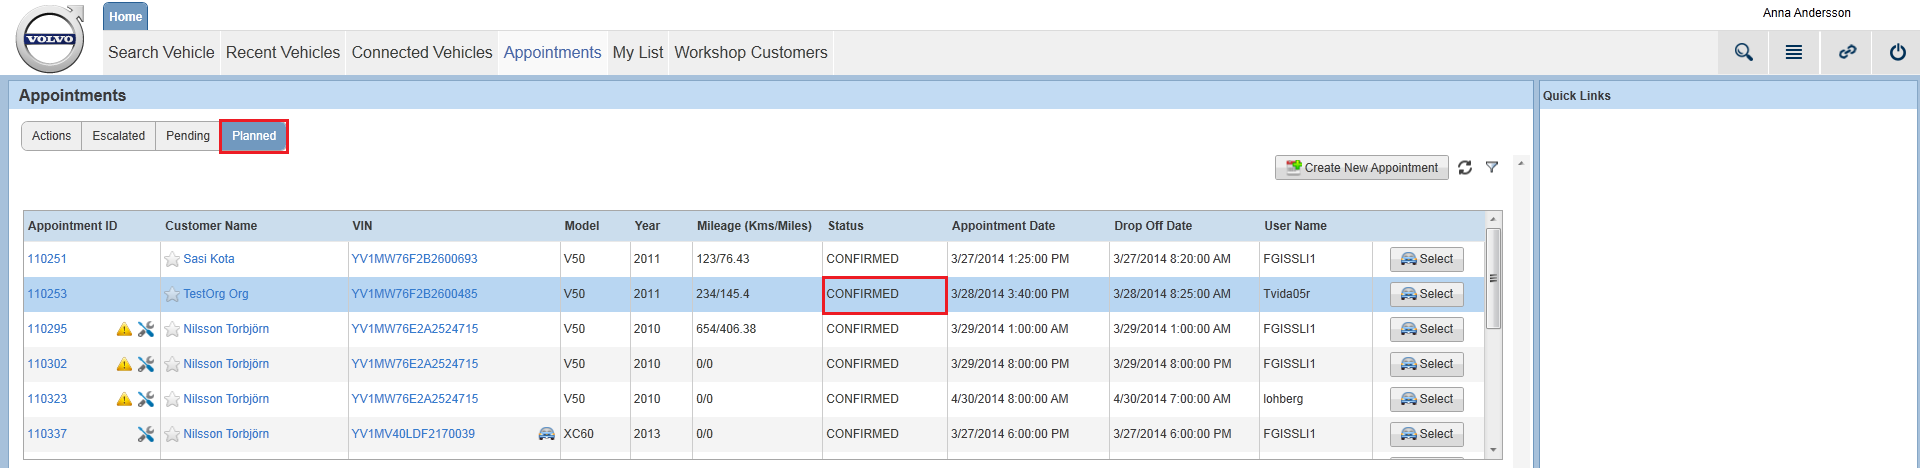
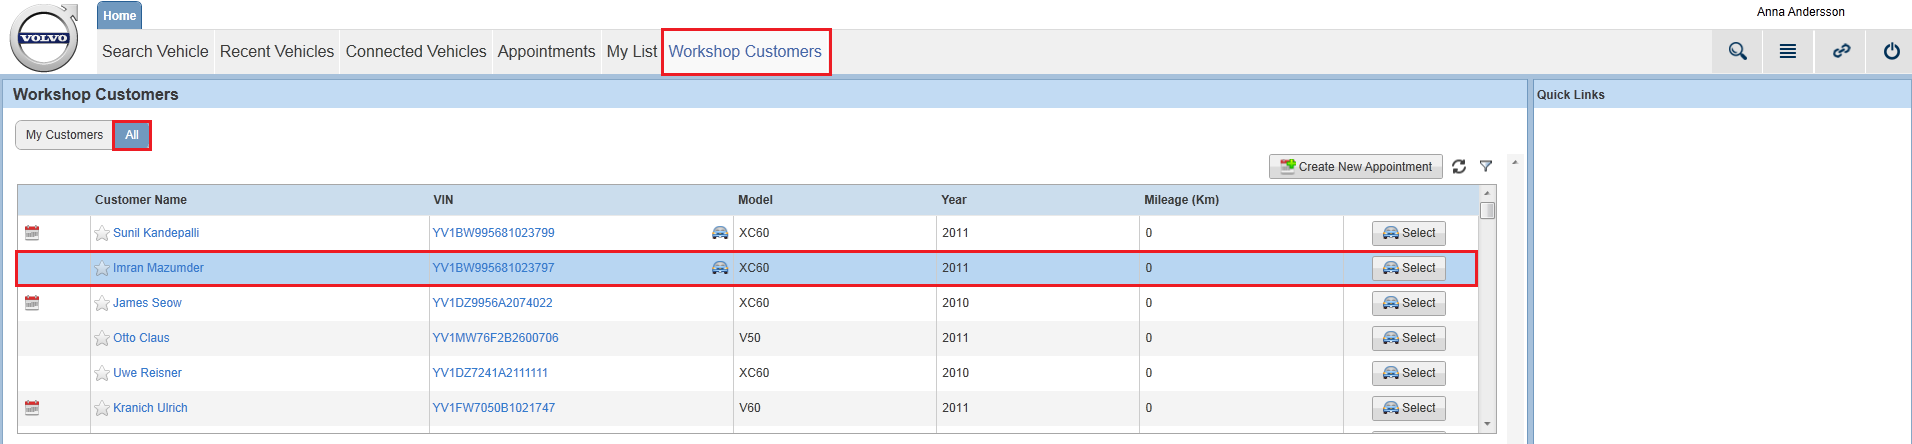
At the customer's selected preferred dealer, the service booking request arrives in the list in the tab with status REQUESTED. The dealer notices the customer’s service booking request shortly after it arrives by regularly checking for newly arrived
requests.
-
The dealer selects the request by clicking the Appointment ID on the row with the customer's name.
-
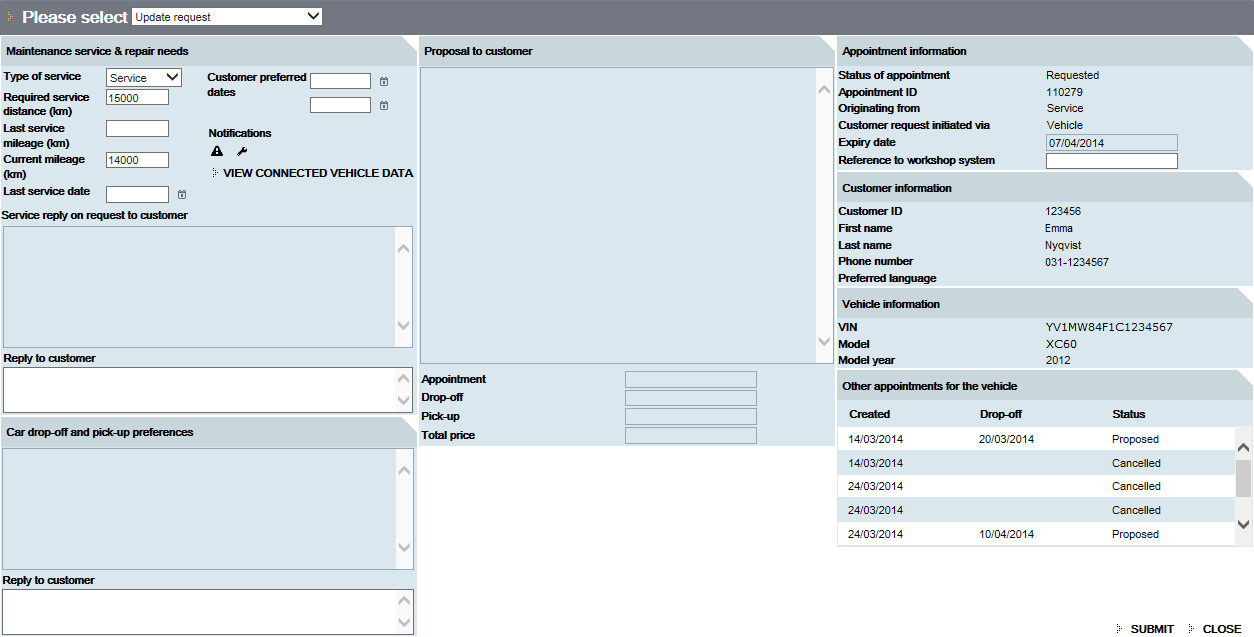
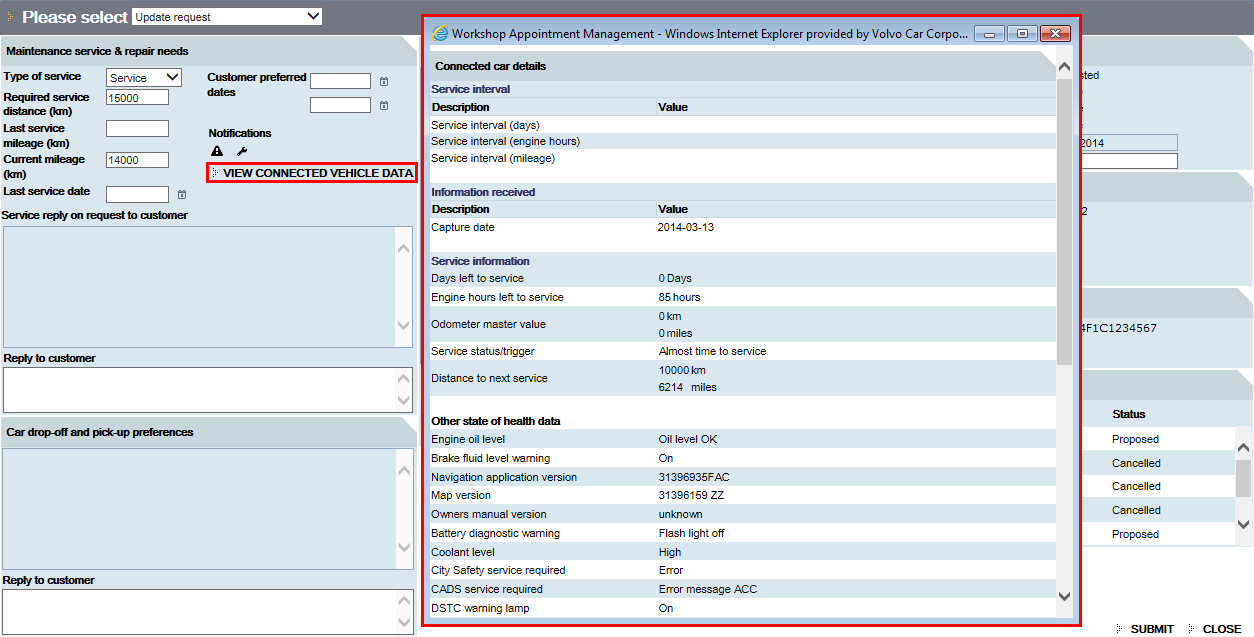
The dealer clicks to view the vehicle's State Of Health data, which was transmitted along with the customer’s request.
This information and other vehicle details can also be accessed by clicking the vehicle's VIN on the tab in VIDA. This data is always the latest State Of Health data.
-
Now that the dealer has seen the customer's request and the State Of Health data, the dealer is ready to plan the service appointment in VIDA. The dealer returns to the list and sets the vehicle as vehicle profile by using the button.
Since the dealer has a DMS interface and the Operations and Packages package included in the VIDA subscription, the dealer is able to search for any open work order. The dealer then opens the work list where QBs are automatically shown for the current VIN. All QB related information is added easily. The service package with operation number, time (VST), parts price etc. is efficiently
selected and added to the work list as well.
Note
Without the Operations and Packages functionalities, this work must be carried out manually. For further information and guidance regarding these functionalities
in VIDA, see the article VIDA Target missing display-db/VST.
-
When the work list is completed, the dealer knows how much time that is needed in the workshop for the customer’s vehicle.
The dealer goes to the workshop planning system to find a suitable day and an available time slot. The time slot is selected
to preliminary make a booking for the customer to use in the proposal.
-
Having preliminarily booked a time slot in the workshop planning system, the dealer must send the appointment proposal to
the customer. This is done by returning to the Manage appointment page, which is still opened in a separate browser tab.
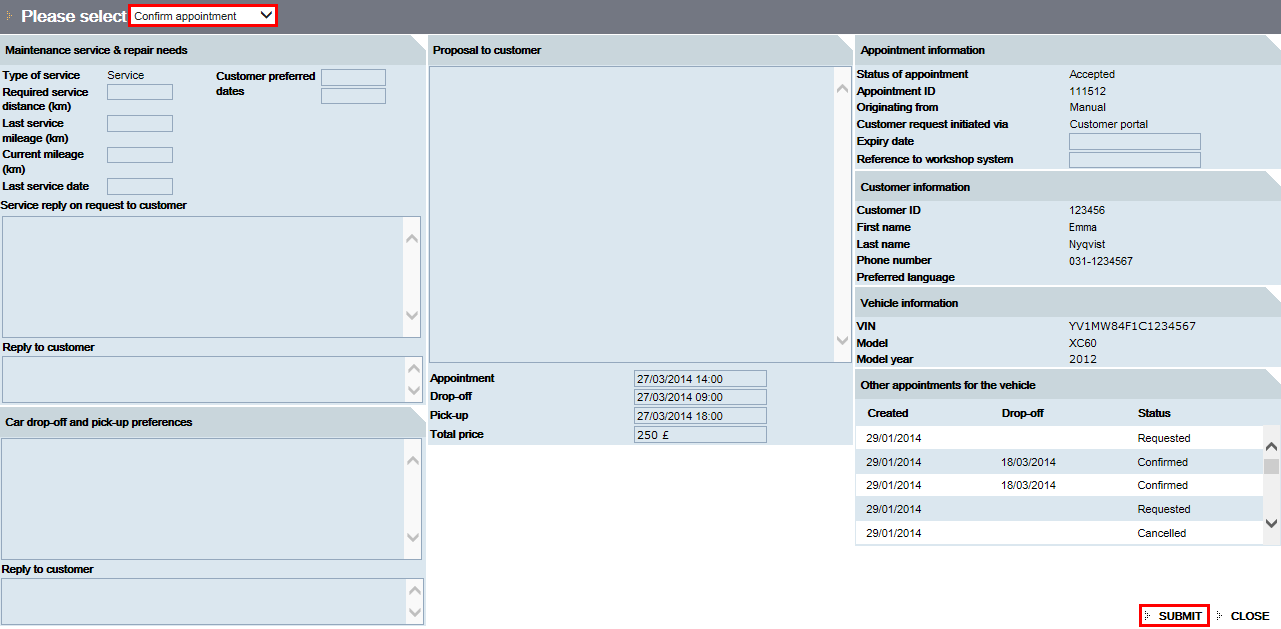
-
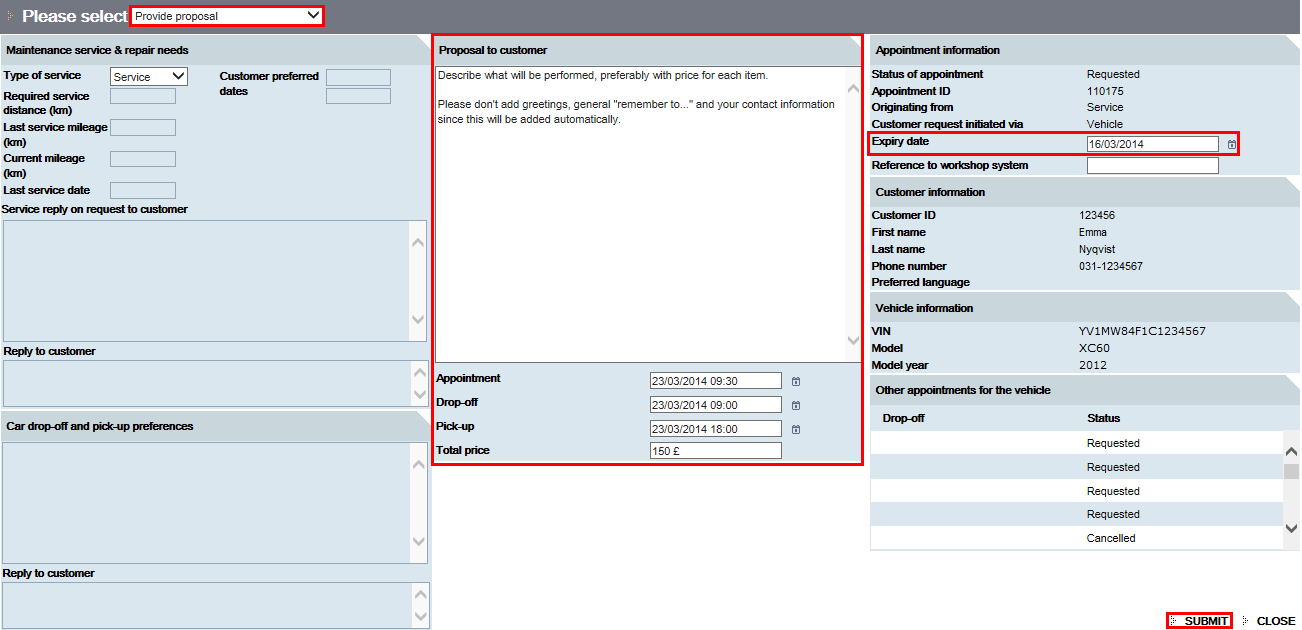
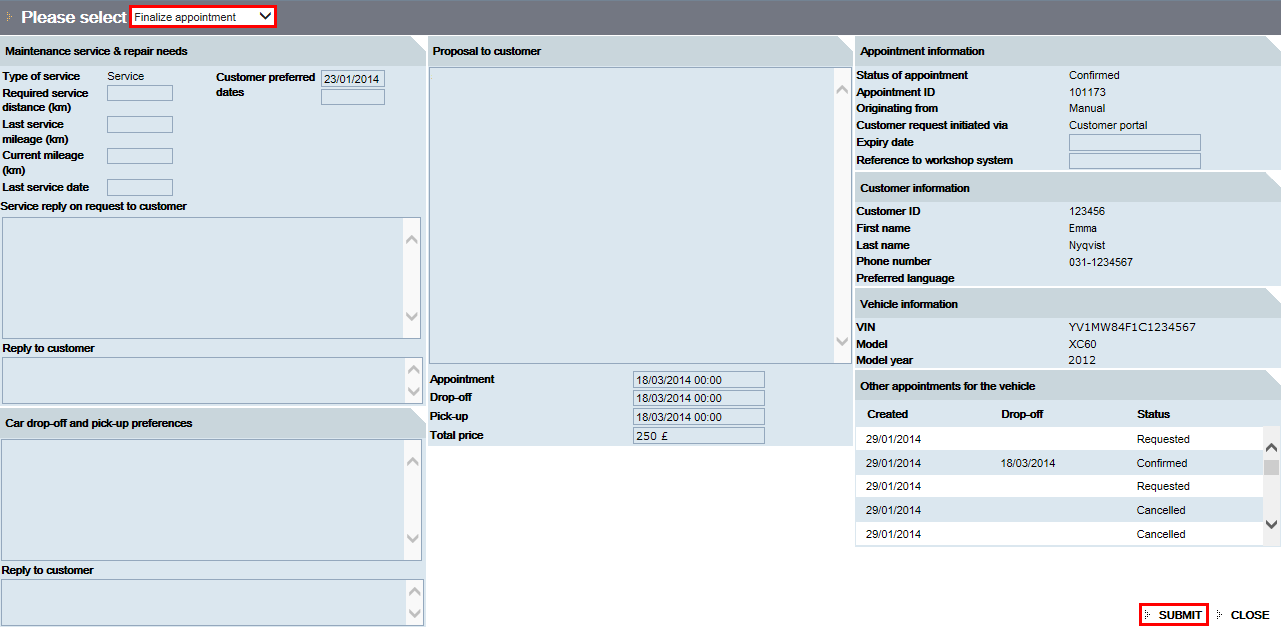
The dealer selects from the drop-down menu and enters all the details regarding the planned appointment including time and cost. Some of
the details are filled by copy/paste from the work list. The dealer also sets an expiry date. This is an indicator that will show the customer how long time an offer from the dealer is valid.
When all fields are filled, the dealer clicks .
| ð
|
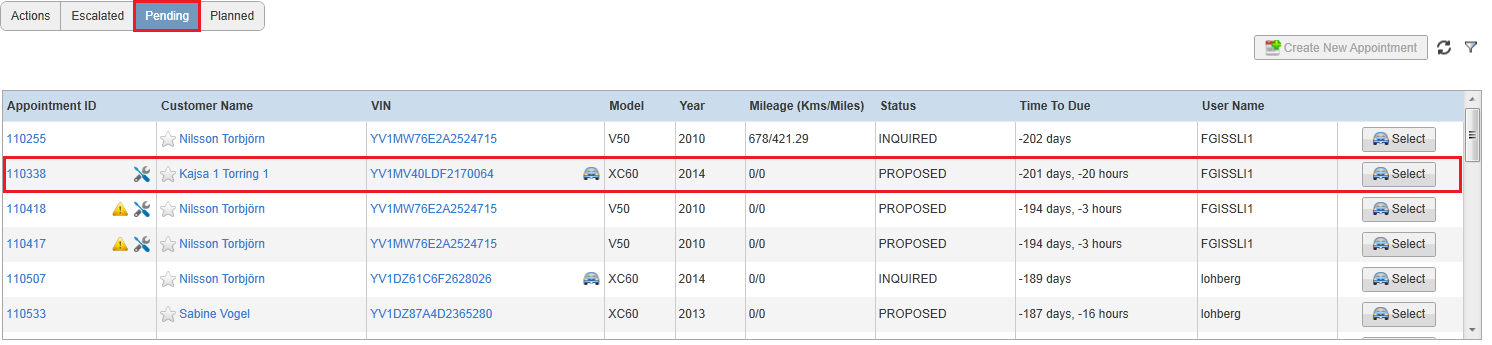
In VIDA, the appointment is transferred from the list to the list with status Proposed.
|
| |
|
-
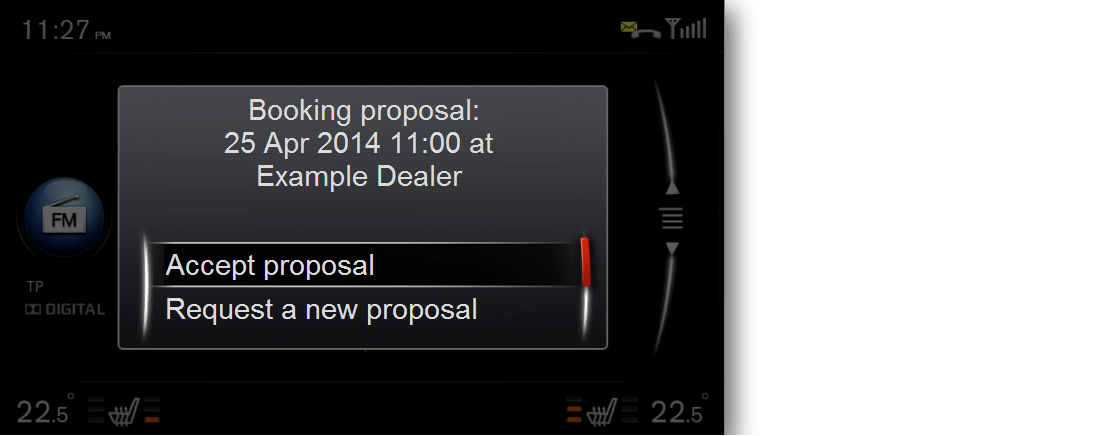
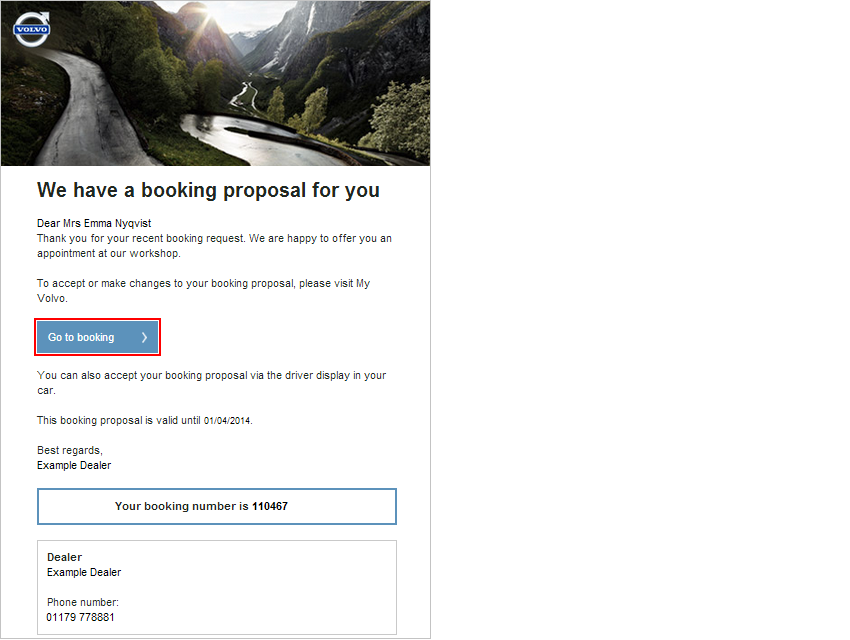
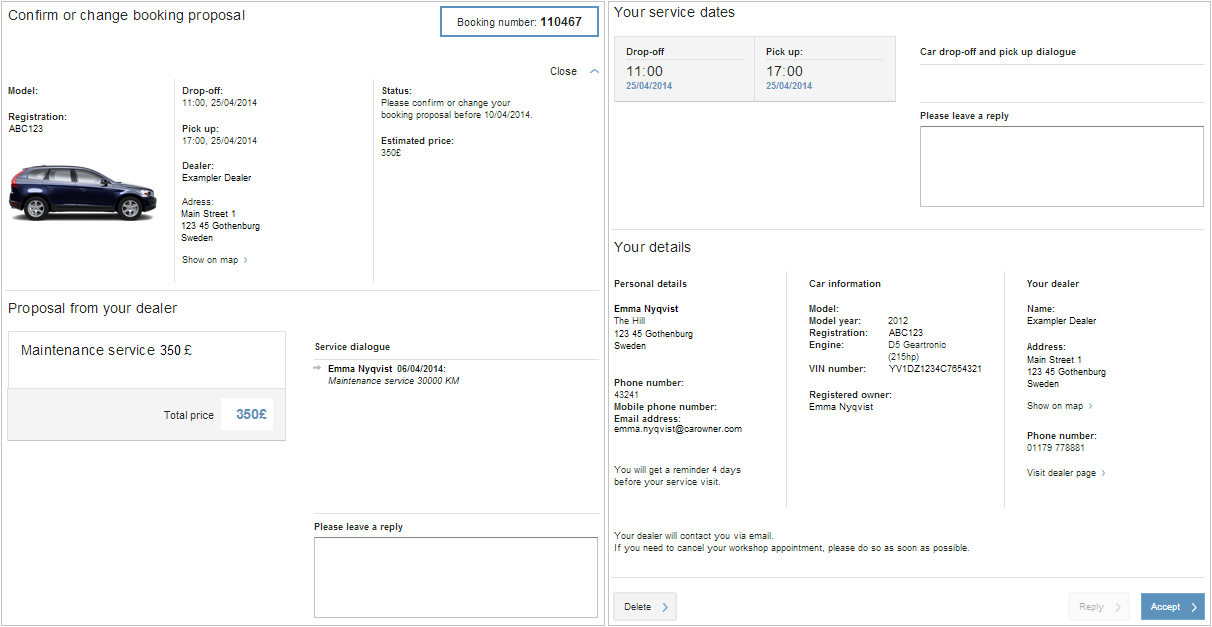
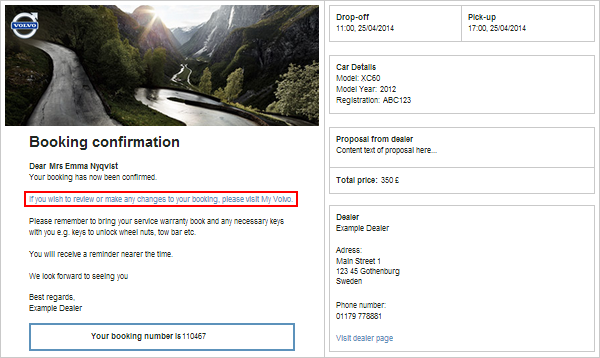
The customer receives the proposal in the following ways:
Via Sensus Connect in the vehicle:
Via email:
Via My Volvo ownership website:
Note
At this stage the customer is able to request another time slot, via Sensus Connect, My Volvo ownership website or by calling the dealer. This requires the dealer to access the workshop planning system again to look
for another feasible alternative day and time for the customer’s workshop appointment and send a new proposal to the customer.
-
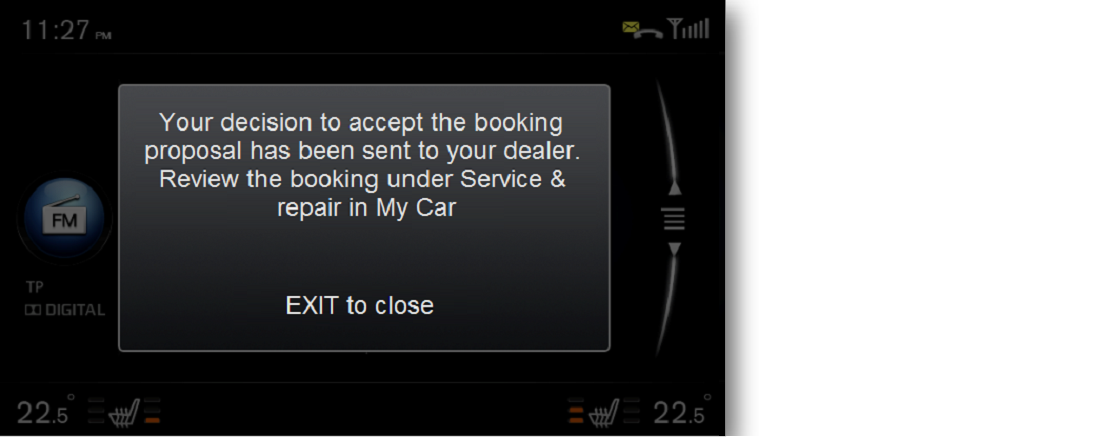
The customer is happy with the booking proposal and accepts it by using Sensus Connect in the vehicle.
| ð
|
As soon as the customer has accepted the appointment, Sensus Connect informs the customer that the acceptance was successfully sent to the dealer.
|
| |
|
-
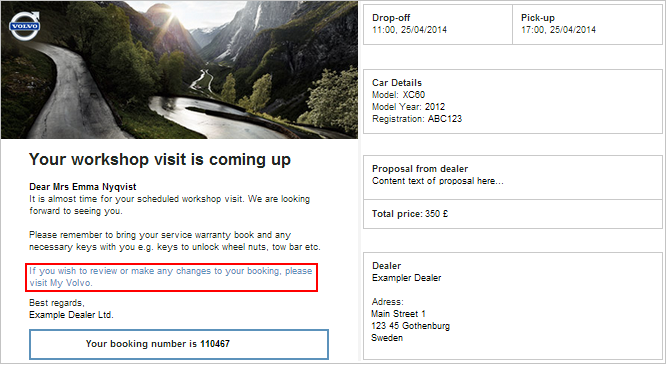
The customer also receives the booking confirmation via email. The email contains a link to My Volvo ownership website.
-
In the list, the dealer sees that the customer has accepted the proposal.
-
The dealer selects the customer/vehicle and clicks the to confirm the agreed booking and work to be performed. This is done by selecting from the drop-down menu and then clicking . This does not generate any further communication with the customer, but is only for internal appointment handling.
Note
When the booking is confirmed, it is important to secure that the provisionally booked time in the workshop is confirmed.
The dealer must also make sure that the workshop planning and the work order was established and finalised before the proposal
was sent. All necessary parts must be available or otherwise ordered.
| ð
|
The appointment is transferred from the list to the list.
|
| |
|
-
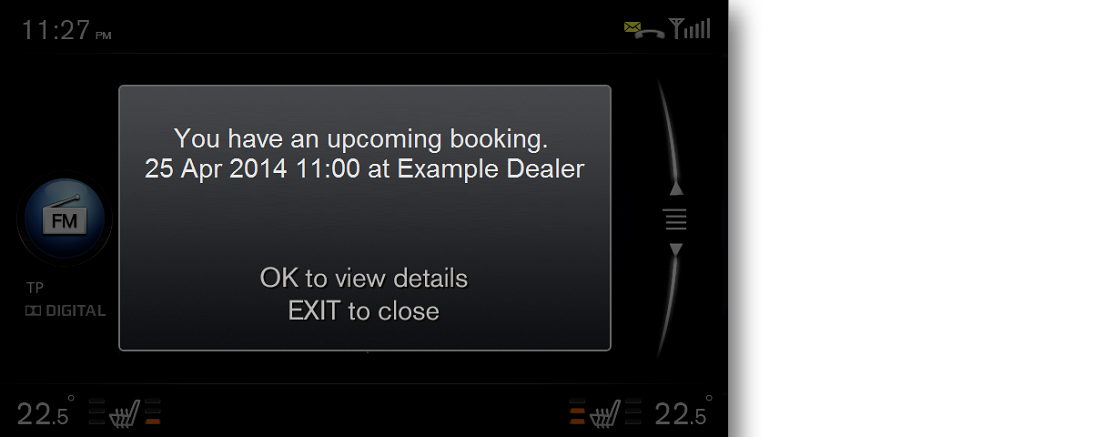
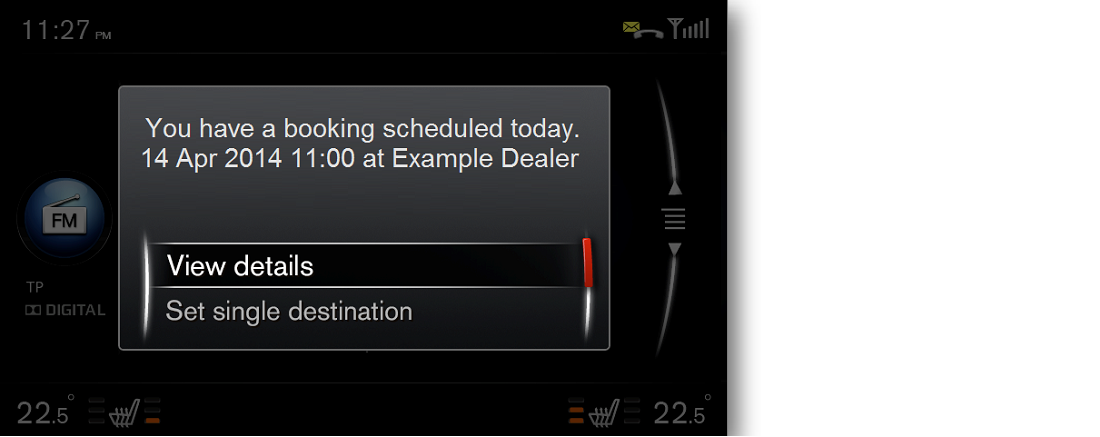
Based on customer settings in My Volvo ownership website, Sensus Connect will display an appointment reminder to the customer 1 to 4 days before the workshop appointment. This reminder will
also reach the customer by email. The email contains a link to My Volvo ownership website.
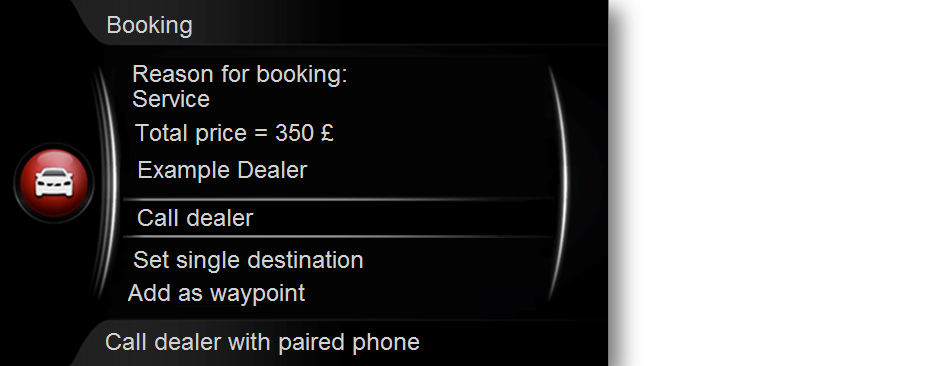
Via the pop-up reminder in Sensus Connect, the customer can view the details of the appointment by selecting .
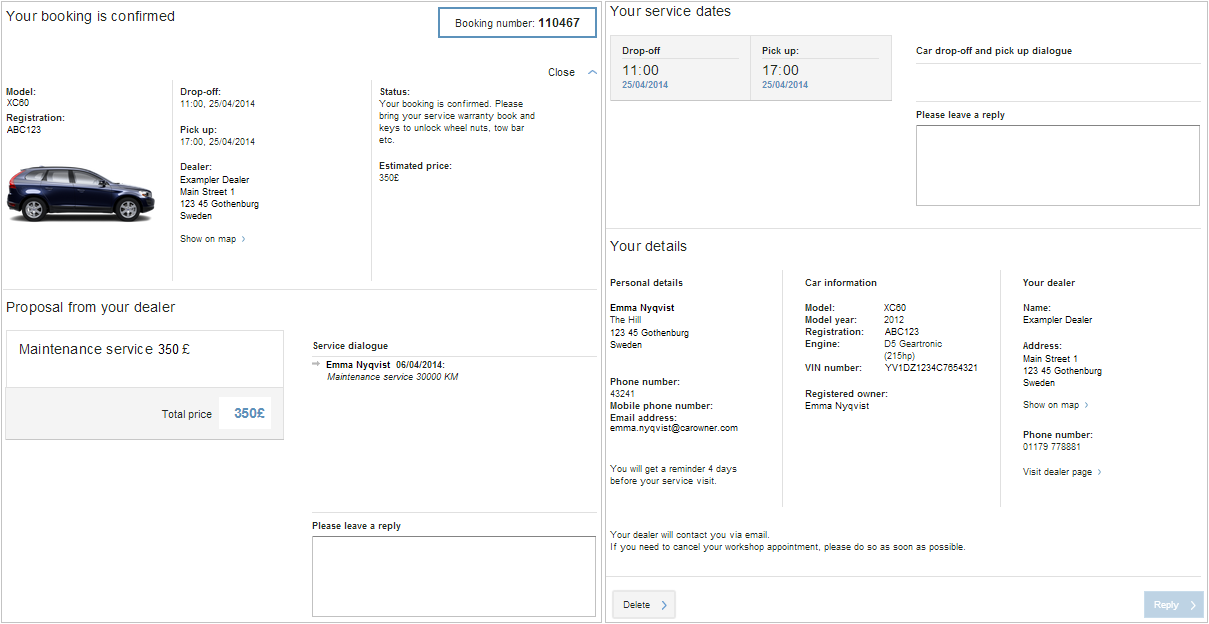
The customer can also access the booking details at any time in Sensus Connect* by selecting , or by following the link in the reminder email to My Volvo ownership website.
* The details about work to be done on the vehicle, coming with the dealer proposal, cannot be seen in Sensus Connect. Only price will be displayed here. Full details in Sensus Connect will be introduced at a later stage.
-
On the day of service, Sensus Connect displays another appointment reminder to the customer, every time the engine is started. The customer is able to view
the details of the appointment via this reminder as well.
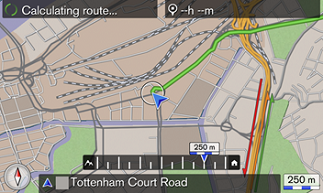
If the vehicle is equipped with Sensus Navigation, the customer can choose to be directed when driving the vehicle to the workshop. There are two options for this guidance,
set as single destination or to add the dealer as a waypoint.
-
When the vehicle arrives at the workshop, the technician performs the work on the vehicle according to what has been planned
and agreed with the customer. When everything is done, the technician resets the service indicator as part of the normal service
routine.
-
As a final step, when all work is completed and the vehicle has been picked up by the customer, the dealer opens the tab. The dealer then selects the customer/vehicle on the list and opens the Manage appointment window by clicking the Appointment ID. The dealer closes the case by selecting from the drop-down menu and clicking .
| ð
|
The appointment is now removed from the list but the customer/vehicle is still available under the tab if the primary driver of the vehicle has selected the dealer as preferred dealer.
|
| |
|
| |
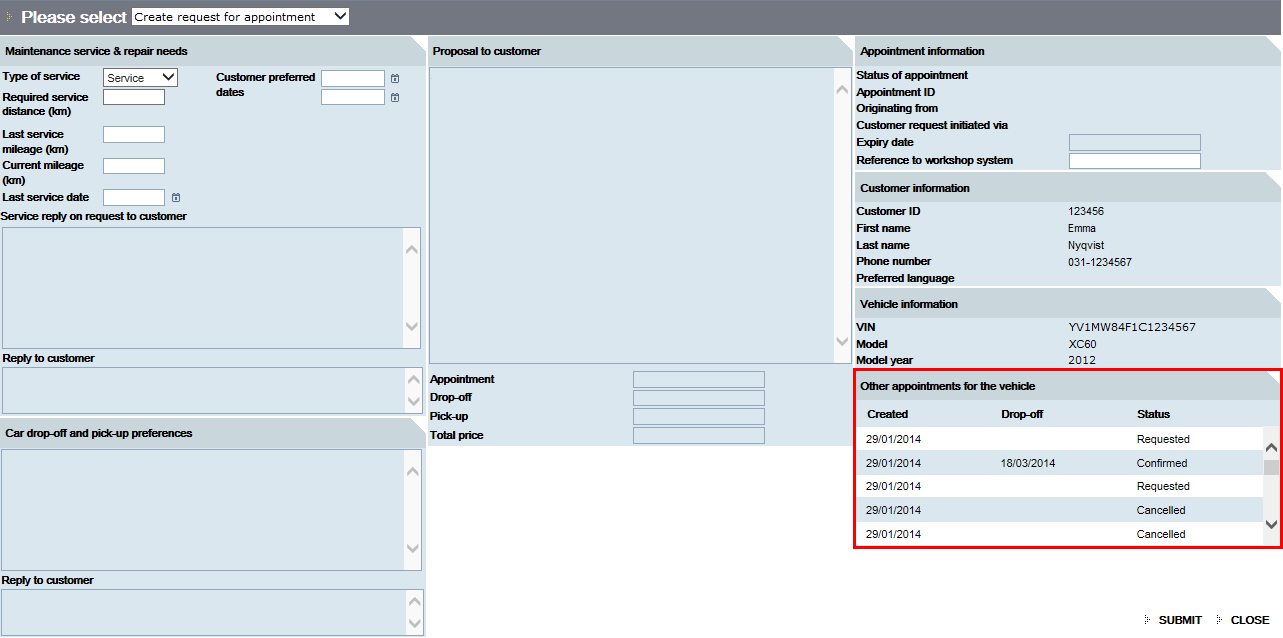
All information about earlier appointments is available in the overview of appointments on the Workshop Appointment Management pages.
|
| |
By selecting a row in this overview, the page is shown as it was at selected time.
|
| |
|